# Makerspace

# 3D Printers


# 3D Design

<span style="mso-bidi-font-family: Calibri; mso-bidi-theme-font: minor-latin;">The simplest 3D design software (and easiest to access) is TinkerCad. It is a cloud-based software, free to create an account, and easy to learn. For more complex design Blender is a free open-source software.</span>

##### <span style="mso-bidi-font-family: Calibri; mso-bidi-theme-font: minor-latin;">TinkerCad </span>

<span style="mso-bidi-font-family: Calibri; mso-bidi-theme-font: minor-latin;">Once you [sign up for an account](https://docs.stgrsd.org/https/tinkercad.com), you can access your 3D designs from any computer with a web browser. They recommend the Chrome browser, but Edge works just as well. For Apple users, Safari does not work well with TinkerCad. </span>

<span style="mso-bidi-font-family: Calibri; mso-bidi-theme-font: minor-latin;">[Tutorials](https://www.tinkercad.com/learn): There are several tutorials you can use to familiarize yourself with the software. Go to </span>[https://tinkercad.com/learn](https://tinkercad.com/learn).

##### Blender

Blender is a much more complicated program that take some time and effort to master. Though the [software is free](https://www.blender.org/), it must be installed on your computer to use it. Go to [https://www.blender.org/](https://www.blender.org/) to download the program and follow the directions to install.

Tutorials: Youtube has many channels devoted to learning Blender. [BlenderGuru](https://www.youtube.com/@blenderguru) is one of the most popular. The [Blender Reference Manual](https://docs.blender.org/manual/en/latest/) is available online and in several languages. The English version can be found at [https://docs.blender.org/manual/en/latest/](https://docs.blender.org/manual/en/latest/).

##### Design Considerations

Take note that your design is completely connected in places where it should be. Especially in TinkerCad, it is easy to miss small gaps that could result in printer errors.

Make sure your design is no larger than 300mmx300mmx300mm. Large designs often have printing errors, and could take one day or more, so scale your design to a reasonable size.

Remember that your design will only print in one solid color: the color of the filament. Many people like to paint their designs.

# 3D Printing

<span class="TextRun SCXW131869090 BCX8" data-contrast="auto" lang="EN-US" xml:lang="EN-US"><span class="NormalTextRun SCXW131869090 BCX8">Once you have a 3D model, there are several more steps to get your model printed. A finished 3D model should be in either an. </span><span class="NormalTextRun SpellingErrorV2Themed SCXW131869090 BCX8">stl</span><span class="NormalTextRun SCXW131869090 BCX8"> or .obj format. You can save/export this type of file from </span><span class="NormalTextRun SpellingErrorV2Themed SCXW131869090 BCX8">TinkerCad</span><span class="NormalTextRun SCXW131869090 BCX8"> or Blender. From there, you need convert that file into a .</span><span class="NormalTextRun SpellingErrorV2Themed SCXW131869090 BCX8">gcode</span><span class="NormalTextRun SCXW131869090 BCX8"> format. This process cuts the 3D model in to layers and instructs the 3D printer on the temperature and speed of the print. The program we use to make .</span><span class="NormalTextRun SpellingErrorV2Themed SCXW131869090 BCX8">gcode</span><span class="NormalTextRun SCXW131869090 BCX8"> files is called Cura.</span><span class="NormalTextRun SCXW131869090 BCX8">; it can be downloaded for free at </span></span>[<span class="TextRun Underlined SCXW131869090 BCX8" data-contrast="none" lang="EN-US" xml:lang="EN-US"><span class="NormalTextRun SCXW131869090 BCX8" data-ccp-charstyle="Hyperlink">https://www.ultimaker.com/software/ultimaker-cura</span></span>](https://www.ultimaker.com/software/ultimaker-cura)<span class="TextRun SCXW131869090 BCX8" data-contrast="auto" lang="EN-US" xml:lang="EN-US"><span class="NormalTextRun SCXW131869090 BCX8">. This software needs to be installed on a computer. There is a computer with this software in the maker space. Cura</span><span class="NormalTextRun SCXW131869090 BCX8"> is a free program released by </span><span class="NormalTextRun SpellingErrorV2Themed SCXW131869090 BCX8">Ultimaker</span><span class="NormalTextRun SCXW131869090 BCX8"> but it is not proprietary; </span><span class="NormalTextRun SCXW131869090 BCX8">it</span><span class="NormalTextRun SCXW131869090 BCX8"> can be used with any model of 3D printer. </span></span><span class="EOP SCXW131869090 BCX8" data-ccp-props="{"201341983":0,"335559739":160,"335559740":259}"> </span>

<span class="TextRun SCXW131869090 BCX8" data-contrast="auto" lang="EN-US" xml:lang="EN-US"><span class="NormalTextRun SCXW131869090 BCX8">Build plate adhesion</span></span><span class="EOP SCXW131869090 BCX8" data-ccp-props="{"201341983":0,"335559739":160,"335559740":259}"> </span>

<span class="TextRun SCXW131869090 BCX8" data-contrast="auto" lang="EN-US" xml:lang="EN-US"><span class="NormalTextRun SCXW131869090 BCX8">Bed Temperature</span></span><span class="EOP SCXW131869090 BCX8" data-ccp-props="{"201341983":0,"335559739":160,"335559740":259}"> </span>

<span class="TextRun SCXW131869090 BCX8" data-contrast="auto" lang="EN-US" xml:lang="EN-US"><span class="NormalTextRun SCXW131869090 BCX8">Print Supports</span></span><span class="EOP SCXW131869090 BCX8" data-ccp-props="{"201341983":0,"335559739":160,"335559740":259}"> </span>

<span class="TextRun SCXW131869090 BCX8" data-contrast="auto" lang="EN-US" xml:lang="EN-US"><span class="NormalTextRun SCXW131869090 BCX8">Print Density</span></span><span class="EOP SCXW131869090 BCX8" data-ccp-props="{"201341983":0,"335559739":160,"335559740":259}"> </span>

<span class="TextRun SCXW131869090 BCX8" data-contrast="auto" lang="EN-US" xml:lang="EN-US"><span class="NormalTextRun SCXW131869090 BCX8">Extruder Temperature</span></span><span class="EOP SCXW131869090 BCX8" data-ccp-props="{"201341983":0,"335559739":160,"335559740":259}"> </span>

<span class="TextRun SCXW131869090 BCX8" data-contrast="auto" lang="EN-US" xml:lang="EN-US"><span class="NormalTextRun SCXW131869090 BCX8">Extruder Speed</span></span><span class="EOP SCXW131869090 BCX8" data-ccp-props="{"201341983":0,"335559739":160,"335559740":259}"></span>

# 3D Scanner

# Laser Engraver

# Airbrush


# Airbrush Assembly

<div class="dpsp-pin-it-wrapper aligncenter size-large wp-image-18571  " id="bkmrk--0">[![Airbrush Assembly and Parts](https://www.sweetsugarbelle.com/blog/wp-content/uploads/2015/03/Airbrush-Assembly-and-Parts-600x305.jpg)
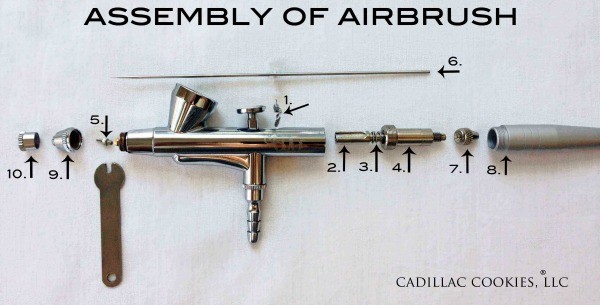
](https://www.sweetsugarbelle.com/blog/wp-content/uploads/2015/03/Airbrush-Assembly-and-Parts.jpg)<svg height="32" viewbox="0 0 23 32" width="23" xmlns="http://www.w3.org/2000/svg"></svg></div>To assemble, follow the instructions below:

<div class="dpsp-pin-it-wrapper aligncenter size-large wp-image-18577  " id="bkmrk--3">[![Assembling an airbrush gun](https://www.sweetsugarbelle.com/blog/wp-content/uploads/2015/03/Assembling-an-airbrush-gun-600x600.jpg)
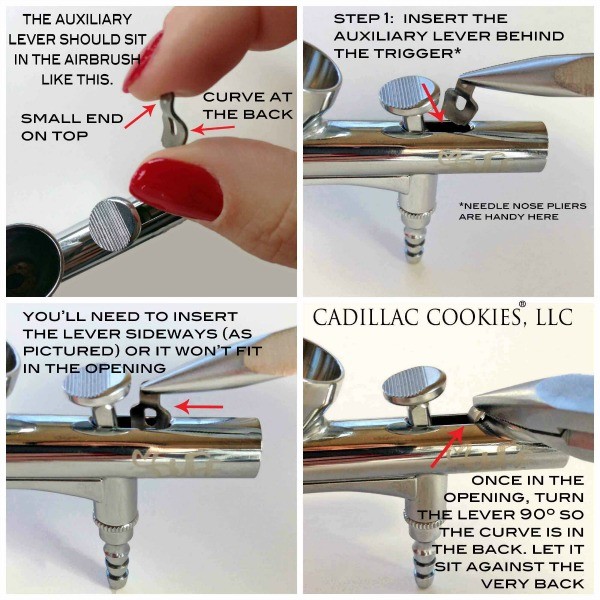
](https://www.sweetsugarbelle.com/blog/wp-content/uploads/2015/03/Assembling-an-airbrush-gun.jpg)<svg height="32" viewbox="0 0 23 32" width="23" xmlns="http://www.w3.org/2000/svg"></svg></div><div class="dpsp-pin-it-wrapper aligncenter size-large wp-image-18580  " id="bkmrk--6">[![Placing Auxilary Lever](https://www.sweetsugarbelle.com/blog/wp-content/uploads/2015/03/Placing-Auxilary-Lever-600x451.jpg)](https://www.sweetsugarbelle.com/blog/wp-content/uploads/2015/03/Placing-Auxilary-Lever.jpg)<svg height="32" viewbox="0 0 23 32" width="23" xmlns="http://www.w3.org/2000/svg"></svg></div><div class="dpsp-pin-it-wrapper aligncenter size-large wp-image-18581  " id="bkmrk--9">[![reassembling airbrush gun](https://www.sweetsugarbelle.com/blog/wp-content/uploads/2015/03/reassembling-airbrush-gun--600x343.jpg)](https://www.sweetsugarbelle.com/blog/wp-content/uploads/2015/03/reassembling-airbrush-gun-.jpg)<svg height="32" viewbox="0 0 23 32" width="23" xmlns="http://www.w3.org/2000/svg"></svg></div>After you’ve replaced and tightened the spring guide (Step 4), double check your trigger. Pull it back and make sure it’s not too loose. If it feels too loose, then you’ve not tightened the spring guide enough.

<div class="dpsp-pin-it-wrapper aligncenter size-large wp-image-18582  " id="bkmrk--12">[![Reassembling Airbrush Nozzle](https://www.sweetsugarbelle.com/blog/wp-content/uploads/2015/03/Reassembling-Airbrush-Nozzle-600x460.jpg)](https://www.sweetsugarbelle.com/blog/wp-content/uploads/2015/03/Reassembling-Airbrush-Nozzle.jpg)<svg height="32" viewbox="0 0 23 32" width="23" xmlns="http://www.w3.org/2000/svg"></svg></div><div class="dpsp-pin-it-wrapper aligncenter size-large wp-image-18575  " id="bkmrk--15">[![Airbrush Needle](https://www.sweetsugarbelle.com/blog/wp-content/uploads/2015/03/Airbrush-Needle-600x600.jpg)](https://www.sweetsugarbelle.com/blog/wp-content/uploads/2015/03/Airbrush-Needle.jpg)<svg height="32" viewbox="0 0 23 32" width="23" xmlns="http://www.w3.org/2000/svg"></svg></div><div class="dpsp-pin-it-wrapper aligncenter size-large wp-image-18583  " id="bkmrk--18">[![Reassembling an airbrush](https://www.sweetsugarbelle.com/blog/wp-content/uploads/2015/03/Reassembling-an-airbrush-600x270.jpg)
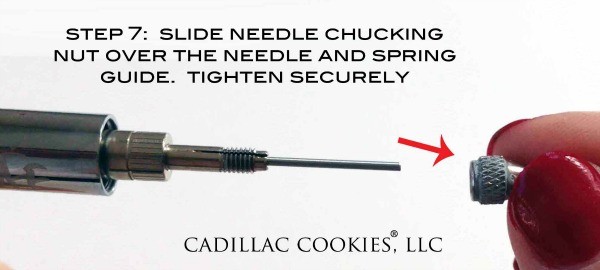
](https://www.sweetsugarbelle.com/blog/wp-content/uploads/2015/03/Reassembling-an-airbrush.jpg)<svg height="32" viewbox="0 0 23 32" width="23" xmlns="http://www.w3.org/2000/svg"></svg></div><div class="dpsp-pin-it-wrapper aligncenter size-large wp-image-18574  " id="bkmrk--21">[![Airbrush Needle Nozzle Cap](https://www.sweetsugarbelle.com/blog/wp-content/uploads/2015/03/Airbrush-Needle-Nozzle-Cap-600x600.jpg)](https://www.sweetsugarbelle.com/blog/wp-content/uploads/2015/03/Airbrush-Needle-Nozzle-Cap.jpg)<svg height="32" viewbox="0 0 23 32" width="23" xmlns="http://www.w3.org/2000/svg"></svg></div><div class="dpsp-pin-it-wrapper aligncenter size-large wp-image-18576  " id="bkmrk--24">[![Airbrush reassembly](https://www.sweetsugarbelle.com/blog/wp-content/uploads/2015/03/Airbrush-reassembly-600x268.jpg)](https://www.sweetsugarbelle.com/blog/wp-content/uploads/2015/03/Airbrush-reassembly.jpg)<svg height="32" viewbox="0 0 23 32" width="23" xmlns="http://www.w3.org/2000/svg"></svg></div>Voila! Your airbrush is clean! Here’s a before and after. You can really see the difference.

<div class="dpsp-pin-it-wrapper aligncenter size-large wp-image-18578  " id="bkmrk--27">[![How to Clean an Airbrush](https://www.sweetsugarbelle.com/blog/wp-content/uploads/2015/03/How-to-Clean-an-Airbrush-600x727.jpg)
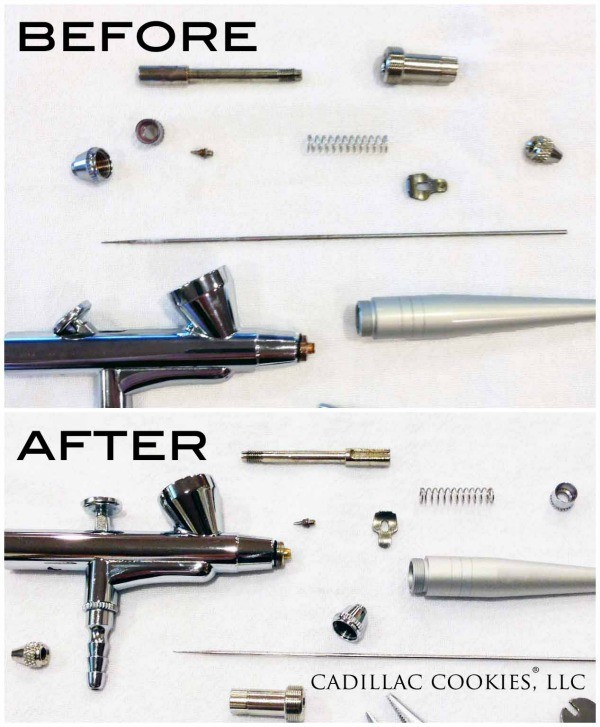
](https://www.sweetsugarbelle.com/blog/wp-content/uploads/2015/03/How-to-Clean-an-Airbrush.jpg)</div>[How to Take Apart and Clean Your Airbrush - The Sweet Adventures of Sugar Belle](https://www.sweetsugarbelle.com/2015/03/how-to-take-apart-and-clean-your-airbrush/)

[airbrush\_assembly.pdf](https://docs.stgrsd.org/attachments/6)

# Airbrush cleaning

Cleaning your airbrush might seem complicated at first, but once you know the basics, you don’t need a mechanical engineering degree to do it.

First, mix two tablespoons of white distilled vinegar with two cups warm distilled water (tap water is ok if you don’t have hard water) in a glass bowl and set aside. You can also use [premixed airbrush cleaner](http://www.globalsugarart.com/airbrush-cleaner-ounces-by-kopykake-p-28367.html), but be sure not to use any products that contain ammonia. It will corrode the brass parts &amp; cause a funky build up. Ick!

<div class="dpsp-pin-it-wrapper aligncenter size-large wp-image-18573  " id="bkmrk--0">[![Airbrush Cleaning Supplies](https://www.sweetsugarbelle.com/blog/wp-content/uploads/2015/03/Airbrush-Cleaning-Supplies-600x477.jpg)](https://www.sweetsugarbelle.com/blog/wp-content/uploads/2015/03/Airbrush-Cleaning-Supplies.jpg)<svg height="32" viewbox="0 0 23 32" width="23" xmlns="http://www.w3.org/2000/svg"></svg></div>Before taking apart your airbrush, make sure it is disconnected from the air hose. You’ll want to work on a flat, clean, light colored surface. Some of these pieces are itty bitty, and can be hard to find if you drop them (trust me). I use a white pillow case that I’ve numbered from one to ten. It’s washable and the labeling helps me keep the parts in the same order that I removed them in. I just spread that over my work table, and it makes the process go much more smoothly.

Note: I’m demonstrating with a Duff airbrush, but all gravity feed airbrushes are essentially the same. The only difference between cleaning the Duff and KopyKake airbrushes is that the trigger/main lever can be removed from the KopyKake model.

Now, for the fun…disassemble the airbrush in the order below. Here are some very brief instructions. Keep in mind there are a few different approaches, this is just my preference.

1\. Unscrew needle cap  
2\. Unscrew nozzle cap  
3\. Use wrench to loosen and remove nozzle  
4\. Unscrew handle  
5\. Unscrew needle chucking nut  
6\. Very carefully remove needle, by pulling it out, towards the back. Sometimes, you might need to twist it a tad.  
7\. Unscrew spring guide. The threading is long, so it might take a while.  
8\. Remove spring  
9\. Pull out needle chucking guide  
10\. Remove auxiliary lever, by twisting 90º and pulling straight out.

<div class="dpsp-pin-it-wrapper aligncenter size-large wp-image-18579  " id="bkmrk--3">[![How to disassemble an airbrush](https://www.sweetsugarbelle.com/blog/wp-content/uploads/2015/03/How-to-disassemble-an-airbrush-600x305.jpg)
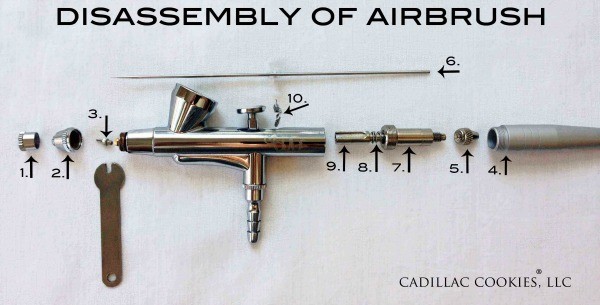
](https://www.sweetsugarbelle.com/blog/wp-content/uploads/2015/03/How-to-disassemble-an-airbrush.jpg)<svg height="32" viewbox="0 0 23 32" width="23" xmlns="http://www.w3.org/2000/svg"></svg></div>Have you ever wondered what all of these parts are called? No worries, I’ve labeled them just for you! That’s a mouth full, right?

<div class="dpsp-pin-it-wrapper aligncenter size-large wp-image-18590  " id="bkmrk--6">[![Airbrush Parts](https://www.sweetsugarbelle.com/blog/wp-content/uploads/2015/03/Airbrush-Parts-600x478.jpg)](https://www.sweetsugarbelle.com/blog/wp-content/uploads/2015/03/Airbrush-Parts.jpg)<svg height="32" viewbox="0 0 23 32" width="23" xmlns="http://www.w3.org/2000/svg"></svg></div>Once you’ve disassembled your airbrush, you’re ready to clean it. It’s amazing all of the color build up you don’t see until you take it apart.

Keep in mind, it’s best not to let your airbrush parts soak overnight. It will not ruin your airbrush, but it can completely remove [the lubrication that allows the airbrush to work smoothly](http://www.airbrushguru.com/FAQ-what-kind-of-airbrush-lube-should-i-get.html).

<div class="dpsp-pin-it-wrapper aligncenter size-large wp-image-18572  " id="bkmrk--8">[![Airbrush Cleaning Solution](https://www.sweetsugarbelle.com/blog/wp-content/uploads/2015/03/Airbrush-Cleaning-Solution-600x399.jpg)](https://www.sweetsugarbelle.com/blog/wp-content/uploads/2015/03/Airbrush-Cleaning-Solution.jpg)</div>