Backing Up Data
Backing Up Bookmarks - Google Chrome
Over the course of the school year a lot of staff members undoubtedly save a lot of bookmarks. We always recommend that teachers back up their bookmarks and save them to their desktop at the end of the year to make sure they don't lose them. All you need to do in order to back up your bookmarks is to follow these instructions:
EXPORTING YOUR BOOKMARKS
Step 1: Open Google Chrome
Launch the Google Chrome browser by clicking on its icon on your desktop or searching for it in your computer's applications.
Step 2: Access the Bookmarks Manager
Click on the three vertical dots located at the top-right corner of the Chrome window. This will open a dropdown menu. From the menu, hover your mouse over "Bookmarks" and then click on "Bookmark manager."
Step 3: Export Bookmarks In the Bookmark Manager
Click on the three vertical dots located at the top-right corner of the page. This will open a menu. From the menu, select "Export bookmarks."
Step 4: Choose a Location
A dialog box will appear asking you to choose a location to save your bookmarks file. We recommend saving the file to your desktop so it will be available on any district computers you access.
Step 5: Provide a Name
In the dialog box, you can enter a name for the bookmarks file if you wish. By default, it will be named "bookmarks.html." You can leave it as is or give it a different name.
Step 6: Save the File
Click on the "Save" button to save the bookmarks file to the chosen location on your desktop.
Step 7: Locate the Saved File
Minimize or close the Chrome browser, and go to your desktop or the folder where you saved the bookmarks file in Step 4. You should now see the bookmarks file with the name you provided or the default name "bookmarks.html."
IMPORTING YOUR BOOKMARKS
Step 1: Start Importing
In the Bookmark Manager, click on the three vertical dots located at the top-right corner of the page. This will open a menu. From the menu, select "Import bookmarks."
Step 2: Locating the File
A file selection dialog box will appear. Navigate to the location where you saved the bookmarks file on your desktop or in a specific folder. Select the bookmarks file you want to import by clicking on it, and then click on the "Open" button.
Step 3: Verify the Import
After importing, Chrome will automatically add the imported bookmarks to your existing bookmarks. You can verify the imported bookmarks by accessing the bookmark bar or using the Bookmark Manager.
Congratulations! You have successfully saved your bookmarks from Chrome onto your desktop. You can open this bookmarks file in any web browser to access your saved bookmarks.
Note: It's important to regularly back up your bookmarks to avoid losing them. You can follow these steps periodically to keep your bookmarks safe.
Difference Between C Drive, P Drive, and OneDrive
Hi everyone, this document serves as a breakdown of the various types of storage that we have in the district. Over the summer your C Drive (local storage) will be wiped. The good news is that most of your data is likely stored on your P Drive and your OneDrive account. Please refer below for a more detailed explanation of these three storage options.
C Drive -
Your C Drive is all of the data that is stored locally on your computers hard drive. In order to save something to your C Drive you would have to open up File Explorer, then navigate to where it says, (C:).
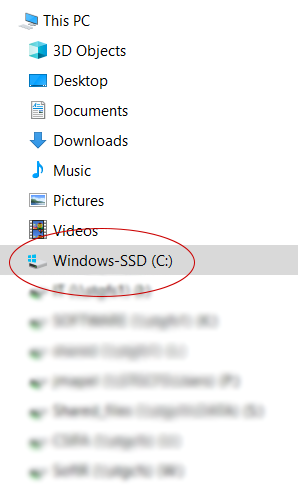
The only files that the IT department stores on the C Drive are the program files such as the Office Suite, LanSchool, and Web browsers. We don't recommend users to save files to their C Drive as we cannot guarantee files saved there will be backed up.
P Drive -
The P Drive is where the majority of your files are saved. Anything that you save on your Desktop, Recycling Bin, Downloads folder, and more will all be saved on our network. These files will be saved and loaded onto every district computer you sign into, essentially bringing the files with you automatically. Everything circled in the picture below is carried over through your P Drive.

An important note is that you will have these files when you log into your district device from home through the VPN. If you have files saved in any of these locations, they will be saved over the summer.
OneDrive -
You can access your Microsoft OneDrive by going to: https://www.onedrive.com and clicking "Sign In"

Once you do that, you need to type in your district email address and your district password. After that you should be greeted to a screen similar to this one:

From there, you can create new files by clicking on "New", or you can upload existing files by clicking on "Upload". Instead of clicking on "Upload" you can also click and drag a file or folder into the OneDrive tab and that will allow you to store the items in the cloud. One important note is that when you upload files to your OneDrive is that you can access them from any device. OneDrive files will also be saved over the course of the summer, so they will not be lost unless a user leaves the district permanently.
Closing -
That's all for the three main pieces of storage that STGRSD staff can use. If you have any questions or concerns with backing up your files please reach out to the IT department via https://it.stgrsd.org.